Showing posts with label tutorial. Show all posts

08 March 2012

How to overcome Doubt?

As an artist or wanna be artist you challenge yourself often, don't you?

If you don't,  you are on the old beaten path and you don't have room to grow.
Let me tell you how it is with me. If I don't grow as an artist, I feel discontentment,  mostly in my stomach but in my whole being is restless... and I work less and less and I slightly become "misunderstood artist".

But the truth is that in the root  of the whole discontentment is doubt.
"Am I good enough?
Is this piece good enough? 
Am I too young for this?  Am I too old for that? 
Do I have time to do that? 
Is this the right path for me? 
Is there a path at all?"


Doubt stands out like this red marble 


When I let doubt stay with me, let it lead me, it kills me literally. It goes to depression, sadness and meaninglessness.
If I overcome doubt it simplifies the creative process, it short cuts the curves, it makes me more productive.
More productivity makes my creative juices flowing, more creativity makes me happier and I love the whole process. It is so worth while.
Here are my techniques:

1. I procrastinate doubt.
When in doubt, I tell myself to paint another painting. When I am in doubt, I tell the doubt to come back later. I want to finish this first and I switch myself into a different mindset, working mode. Flowing mode.
More often than not the doubt goes away.

2. Sometimes the doubt is bigger than the above one and comes back.
OK.
I sit down and let it be. "I am here for you." I set a time frame, "I have half an hour for you"- I don't want to stay in doubt for long.
And I empty out.
I write down the words of the doubt as they are. I write down each and every question,  statement,  feeling and not knowingness. I let the doubt come to the surface of my consciousness. Sometimes the doubts are accompanied by fear and judgement. Well it is good to know who is my killer, isn't it?
I put down even that I don't know what to do, and how to overcome this. I just write and write and write.
I write and write... and a magical moment comes. It always happens.  Something changes. Something opens up. I see clarity. I feel wholeness. Fresh new energy fills me up.
I let the energy fill up the doubtful thinking. Sometimes it makes me laugh. Sometimes I feel I was just disconnected, nothing serious, nothing bad happened. I can even hug the doubts.

10 January 2011

Hello Spring! Wreath Tutorial

Hello spring! Where are you? I am here waiting for you... yes, I know... it's still January...
Well, if you are a little bit impatient, like me...
here is a spring wreath to make....

What you need:
-styrofoam wreath
-handful of wooden flowers
-colorful fabrics
-hot glue


Start with a styrofoam wreath: cut out strips of fabrics and cover the surface of the wreath, you might want to glue the ends of the strips


Cut out small strips of fabrics (mine strips were 2x16 cm,  0.8x6.3")
and make a knot on each in the middle


Hot glue these small strips to the surface of the wreath,
create layers enough to cover the entire front suface,
add the flowers as well 


End result: color and texture for your wall or door.
Enjoy!

14 July 2010

How To Make A Colorful Flower Stand?


Oh yes, I felt again that I must paint something. I needed more colors. Finally I dug out some leftover concrete-tubes from a previous house building project. They were used as supporting pillars.
How nice. They can be flower stands in their next life in the garden.
So?
May be that you want more color too into your life.
Here it is how it happened to me, use this post as an inspiration. Color your life! It is easy. Really.


First scene: what you need- concrete-tube cut into desired sizes. I had 2x 50cm  and 1x 70 cm tall pieces.
                                          - paint  suitable for concrete painting. My choice were blue, yellow and white.
At this point you are not surprised by my color choice.... if you read my other post about flip-flop stamps and about coasters.


Second scene: the work- paint as you like
I like to paint simple and effective patterns  like these spirals.
I never lose interest in spirals. 
That is a mystery in itself.  


Third scene: waiting, drying...
This is my weakness. 
So I go for a walk. 


Fourth scene: dress rehearsal... 
This is the time when I consider that my flower stands are a little bit unusual. So may be I need some moderate plants... and I don't have any... at this moment. 


11 June 2010

How to Make a Room Divider or Fly Curtain? Part 1.

Fly curtain or room divider?

It depends. It depends on the size only.
I designed a fly curtain, but... if you make the letter-scale bigger ... let's say 300% or  500%... than you got a room divider.

Strange idea said my husband to me. Why don't we use a simple net to cover the door to the patio?
It is so dull- I said to him. Here is my plan:
I cut out big letters from a piece of felt and sew them together vertically,  I make some embellishment  and go. Isn't it cool?

So what I need: -felt pieces (I have 3 colors, white and red are quite thick and
                           the orange one is thinner,
                           no problem, letters need thickness, so I use the red as a base)
                         - a pair of scissors
                         - threads for embellishment
                         - a needle
                         - few meters of a yarn to sew the letters together
                           (first I thought orange would be cool
                           than in reality orange became too much - visually I mean-
                           so I changed the color into a neutral colorless...)


First I make my pattern for lettering: 
A 5x9cm (2x3.5 in) square piece of red felt.
I write each of my letters into this pattern, because I want to use my
scissors freely, so this little pieces of papers are just reminders.
My words are like these: 
enlightenment, follow your heart, grace is in the now,
joyful journey, blissful life, moment


Here comes the fun part:
cutting letters


I save the scraps for future in between elements.
When the letters are finished I dig out the big pieces from the scraps and mix them
with white and orange. I cut simple shapes like squares, hearts and circles, 
sew 2 or 3 together with a simple cross stitch or a double one.
These gonna be divider elements. 


To make each and every pieces ready ... well it takes time
 I can tell you now. 

See the finishing steps at Part 2. 

23 May 2010

How to Make a Designer Necklace?

Originally I had a silver pendant and I decided to make a colorful necklace to hold it.
I searched over and over my drawers and finally found these items, and I suddenly saw
my designer necklace in my mind's eye.
Materials you need: 
colorful yarns, I choose 3 different colors
and a silver thread 
"macaroni"-size  plastic tube 
hot glue
magnetic fastener

1. cut a necklace size from the plastic tube
I wanted a middle size one so I measured 70 cm
S 50 cm
M 70 cm
L 90 cm

2.  make a knot around the tube and begin to wind the weft around the tube
change colors as often as you wish overlapping the previous loose end.
This easy technique is coiling: a method for making 
baskets for centuries in almost every culture.


3. Cover your tube fully. Use your yarn tightly.
4. At the very end of your tube fix the loose yarn with a fleck of hot glue 


5. Finish it with a magnetic fastener. 
As you glue the magnets into the hole
your yarn-end would be securely double-finished


Version 1: I used a shawl clip to make my necklace hip.
Version 2: I coiled the silver pendant and... 

I can't decide which version I like better. 
Can you?

14 May 2010

How to Use Your Flip-Flop for Your Art Project?

Sometimes brainstorms happen.
That time no choice but paint.
Anything anywhere, just color.
Color into the night.
Square meters are needed to color.
And more.
Paper, canvas, or other art project.
If you feel like this sometimes,
then you know how fruitful and rich those hours.

Materials you need:
an old flip-plop, preferably one with textured surface
acrylic paints
a pair of scissors
brush
paper or textile
I printed on cotton

Cut simple shapes from the flip-flop
Don't worry if you shapes are not perfect


Try your shapes and colors on a piece of paper.

Use your stamps freely. Color and mix.
Let your fantasy move your stamps.

You might want simple overlaps like I did here

or more loose brushstrokes as a base and than stamp.

Let them dry.
Iron them and they are to use for art projects.
Table cloth, cushion, book-cover, quilt, bag?


09 May 2010

How to Make Colorful Coasters?


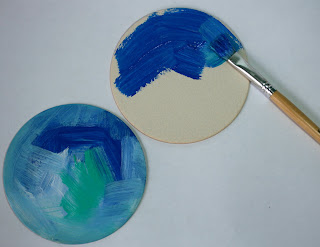
Materials you need:
round cardboard pieces
(you can use your old coasters also if you
want to give them a fresh new look)
3 colors of acrylic paint of your choice
brush
drawing ink and a bamboo-stick
and decoupage glue
Loose brushstrokes. That's all you need.
Have fun! Mix and paint.

After a few minutes as the first layer has already dried
I cut out a heart shape from a piece of not too thick cardboard
and use it as a template.
Use black drawing ink and a sharpened bamboo-stick to embellish.
My lines are uneven and I am very happy with this outcome.


Let them dry. At this point I am really impatient...
so I do something else instead of waiting there...
And finally paint a decoupage-glue-cover layer on top.
It makes the coasters waterproof.
And here they are, ready to use!
Have happy drinks, have fun, have friends!

And I wouldn't be surprised if you want to
paint more. Be ready. New surfaces are thirsty
for refreshment.